By: Trevor Knight – Fishidy Pro Angler
As with other sports, bass fishing has an offseason in which there are no major tournaments taking place. During this time many pros like to switch gears and focus on hunting. Personally, I never got into hunting because I didn’t really like the taste of wild game and didn’t want to kill something I wouldn’t eat. Instead of sitting around watching football, I use the offseason as a time to organize my gear, repair equipment and make my own baits.
I really enjoy making my own lures. I always had an artistic side growing up and enjoyed tinkering with lures at a young age. There’s also a great sense of achievement from catching a fish on a lure you made from scratch. Making your own baits can also end up saving you a lot of money over time, once you get past the initial start-up costs. In this post, I’ll discuss how to create fishing lures and the equipment needed.
There are many different facets of lure building, but to simplify things, lure building can be broken up into three basic groups: hard baits, soft plastics and wire/lead baits.
Hard Baits
Hard bait lure building is probably the least hazardous category but also one of the most expensive. To really go about hard bait production properly, you’ll need the following items:
- a quality air brush
- a compressor
- numerous air brush bottles
- acrylic paints
- paint thinner
- epoxy gel coat
- stencils
- fly tying vices
- lure eyes
- hooks
- split rings
- lure bodies and lips
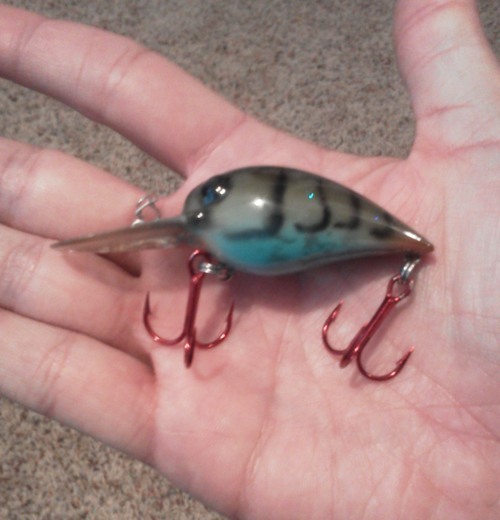
A dual-action airbrush and compressor will be the most expensive items to start-up, but they allow you to create more detailed paint schemes than with a standard brush. Once you have those things you’ll need lure blanks. They can be carved balsa or cedar wood, premade plastic, or you can create a mold and pour urethane blanks yourself. With wood or poured urethane you’ll also need screw eyes and bills.
The paint will need to be thinned so it doesn’t clog the airbrush. Make sure you’re painting in a well-ventilated area. Wearing safety goggles and a respirator is recommended, especially if you’ll be painting a lot of lures. A base coat of gray or white is the first layer to be sprayed on the blank. After that, the painting process depends on what design you want to create. Simple color schemes may only require one or two colors, while detailed patterns may require 10 or more colors along with the use of stencils to get the desired effect.
Once the paint is complete, you can add adhesive eyes to the bait for a more realistic look. After that, an epoxy clear coat is a good idea to help protect your prized paint job. The worst thing is to spend hours and hours on your paint scheme only to have it chip and flake after hitting a rock or catching a fish. Once the clear coat has cured overnight, split rings and hooks can be added to complete the bait. While it can be expensive to make your own hard baits, it can also become a nice career. I know several anglers who’ve made a good deal of money starting their own custom paint services and lure companies.
Wire and Lead Baits
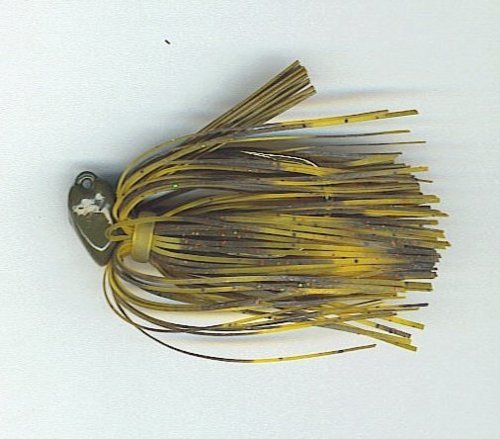
Wire and lead baits are not as expensive or complex to make, but they’re the most hazardous. In order to create your own spinnerbaits, buzzbaits, chatterbaits and jigs you’ll need an aluminum mold, lead melting pot or ladle, lead ingots, hooks, paint, epoxy clear coat, lure eyes, blades and other hardware, weedguard material, gate sheers, safety goggles and skirt material if needed. As an example, I’ll discuss how to make a flipping jig. The first thing you need is an aluminum jig mold in the style you want. You’ll also need soft lead. Soft lead is required because it will melt more easily than hard lead — it can be identified by scratching the surface of the lead with a fingernail. If it scratches easily, it’s probably soft lead. It needs to be heated to a temperature range between 700 and 800 degrees. Therefore, you’ll need a melting pot or melting ladle.
Here’s what you’ll do first:
- Put the soft lead into the melting pot and wait for it to turn to molten form.
- While the lead is melting, take the required hook and weedguard and place them into the mold in the prefab locations.
- Close the mold and then pour the molten lead into the opening at the top of the mold until the entire cavity is filled. As a precaution, make sure to wear heavy leather gloves and safety goggles.
- It’s critical you do not pour too slowly or the lead will cool and wrinkles will form in the jig.
- Within about ten seconds of pouring the lead, you can open the mold and take out your newly cast jig. It should be cool enough to handle.
Now you can paint the jig head. You can use brush on vinyl paint, but it’s not as durable as powder coat paint.
To powder coat a jig:
- Hang the jig in an oven at 325 degrees for 10 minutes.
- Take the heated jig out of the oven and quickly swish the jig back and forth in the powdered paint for a few seconds making sure the jig’s entire surface has been covered. The powder will melt and gloss over.
- To make the paint finish more durable take the painted jig and put it back in the oven at 350 degrees for 15 minutes. This process is called curing.
A trick that will help prevent the weedguard from warping in the oven is to wrap the end of the weedguard with a small piece of wire. It will help the weedguard keep its shape.
The final process is to make a skirt for the jig. Rubber or silicone layers can be used. You will need a skirt-making tool, which spreads the skirt collar apart.
- Put a skirt collar on the tool.
- Then add the desired layers to create the color pattern you want.
- Pull the layers through the collar.
- Push the collar off of the tool and onto the skirt layers.
- Trim both ends of the skirt tabs and you now have a jig skirt.
You can also hand tie the skirt to the jig if you do not have a skirt making tool. The process is similar to tying a fly.
Soft Plastics
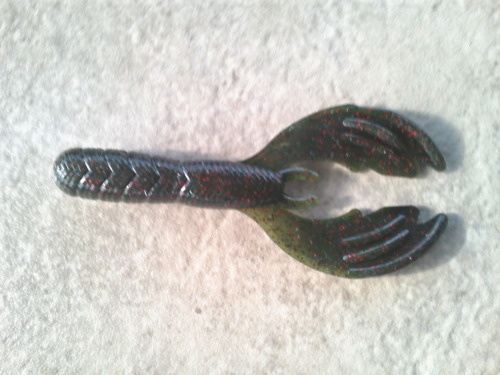
Probably the most diverse and customizable facet of lure making is with soft plastics. There are so many shapes, sizes, actions, sink rates, colors and attractants that can be altered. It’s not quite as hazardous as casting lead baits, but precautions do need to be taken. The equipment needed to make soft plastics includes:
- liquid plastisol
- colorants
- glitter
- softener
- hardener
- scents
- a heat source
- aluminum or pyrex cups
- stirring rods
- salt
- safety goggles
- gloves
- molds
First, you will need to decide how you want to heat the plastisol. Many custom lure makers like to use a microwave. Some like to use large presto pots. The method I like to use is a hotplate. That’s because it’s cheap, easy to clean and it allows me to heat up the plastisol very slowly and then maintain a constant temperature. The microwave tends to heat the plastisol too fast and unevenly, which can result in scorched plastic. The nice thing about the microwave is that it allows you to keep fumes away from your face, it’s easy to clean, and pyrex cups are easier to clean than aluminum ones. If you use the microwave method, you’ll use pyrex cups in order to heat the plastisol. If you use the hotplate method like I do, then you’ll use aluminum or stainless steel cups. Aluminum is preferred because it will heat up faster and more evenly than stainless.
The most important thing when making soft plastic lures is to have lots of ventilation. I like to pour my plastics out on a patio and have a large fan located next to the hot plate to move the plastisol fumes outside.
After the hotplate and fan are set up, follow these steps:
- Measure out a small amount of plastisol, usually 4 ounces, and pour it into an aluminum cup. Make sure you’ve stirred the plastisol in its container first to make sure that it’s mixed well.
- Then add any softener or hardener depending on the bait type you’re making. This process can be skipped if you’re already using a hard formulation or super soft formulation.
- The next thing to add is whatever scent you want in the bait.
- Once these things are added, start to slowly heat up the plastisol. Plastisol starts out as a milky white liquid that must be heated to roughly 320 to 340 degrees. Once it gets to roughly 300 degrees it will turn into a clear gel. At roughly 310 degrees it will turn into a clear liquid, and at the 320 to 340 degree range it will be at the consistency of corn syrup.
- At this point it will be ready to pour. It’s important that you slowly stir the plastisol periodically as it is slowly being heated. This will help prevent scorching.
- Once the plastisol is ready to pour, I add glitter and colorant to create the desired color pattern.
- If you’re using a hand pour mold, you then slowly and steadily pour the hot plastisol into each cavity of the mold until each one is filled completely. Allow the plastisol to cool for 2 minutes and then demold the baits.
- If you’re using an injection mold, take your hand injector and suck up the hot plastisol. Place the injector into the opening of the injection mold and slowly push down on the hand injector until it becomes difficult to push any longer. Remove the injector and allow the baits to cool for two minutes before demolding.
- After demolding, lay the baits out on a piece of aluminum foil to cure for 24 hours. With injection made baits, you can leave the baits on the runner and hang them on racks to cure.
The curing process is important because it allows the bait to cool and harden all the way into the center of the bait. This will prevent deformation. One thing to remember is if you’re making a bait full of salt, keep the bait away from water during the curing process. The salt in the bait will absorb water and cause the bait to swell.
Making your own baits can be a rewarding experience. The feeling you get from catching a fish on a lure you made yourself gives you a sense of pride and accomplishment that cannot be duplicated by catching fish on purchased lures. It also gives you the ability to create lures and colors that nobody else has, which can help you catch more fish. You even have the possibility of making some money by making your own lures and selling them to other anglers. Hopefully, this tutorial has helped you learn the basics of lure making and sparks your interest to give it a try. Maybe you can create the next hot lure.
Now it’s time to get Fishidy!


Thanks. Always like to get another view of a process. You never know everything